
Droehm Team:
Learning Is a Journey
Quest 3: Diagrams
With Diagrams and Text Evidence
Q3P1: Newton's 3rd Law Lab Stations
Google Classroom: Open the Q3P1: Newton's 3rd Law Lab Document. You will answer the questions in the document but the directions for the lab stations are listed below. It is really important for you to read the Big Idea for each station before you do the lab.
Spring Scale Tug of War
Big Idea: When two objects interact, they push or pull on each other with equal strength.
-
Hook two spring scales together end to end.
AT NO POINT SHOULD YOU PULL THE SPRING SCALES BACK ALL THE WAY!! They break easily!
2. One student will hold the spring scale perfectly still while the other student pulls back at the same time.
3. Look at the measurement of force on both spring scales as you do this. AKA - Look at the numbers! What does the numbers read!
4. Repeat and now have the first student pull while the second student holds perfectly still.
5. Again, look at the measurement of force on both spring scales.
2 Wheely Chair Shove
Big Idea: The forces in a pair always act in completely opposite directions.
1. Have two students sit in wheely chairs facing each other
and holding out their hands.
2. One student will push on the other student’s hands while
the student in the chair stays completely still.
3. Observe what happened to both chairs when this occurs.
Force Pair Card Sort
Big Idea #3: Forces always occur in pairs acting between two objects.
1. There are 5 pictures at this station.
2. Use the whiteboard marker to draw an action-reaction force pair
on each of the pictures. You just need to draw the arrows - you
don't need to write the full sentences (you will just tell Mrs. Roehm
when you are done.)
3. Check in your force pairs with Mrs. Roehm.
YOU HAVE TO SHOW HER YOUR ARROWS ON THE IMAGES.
4. Use DRY paper towel and wipe off the laminated cards. Put the cards back in the zip lock bag.
5. Once you have showed Mrs. Roehm your arrows on the images, answer the lab questions.
Balloon Rocket
Big Idea: For every action, there is an equal and opposite reaction.
-
Set up the balloon rocket to look like this by completing the following steps :
-
Blow up a balloon. Hold the balloon closed so no air escapes. DO NOT TIE THE BALLOON.
-
Hold closed the opening of the balloon and have someone tape a straw to the side of the balloon while it is inflated (The balloon should still be blown up! But DO NOT tie the balloon!)
-
Make sure the straw runs up and down the longest part of your balloon (the side so that the straw is facing the same direction as the air hole in your balloon).
-
Thread the fishing line/string through the straw and hold the fishing line tight. If the fishing line/string is not tight (taut) this will not work.
-
Release the balloon while continuing to hold the fishing line tight!
-
Continue to run different trials with your rocket to see how you can change how the rocket accelerates.
-
Go get a diagram paper from the front table. Your diagram has to be approved by Mrs. Roehm in order to move on to the Pocket Car Station. Answer your lab question.
Pocket Cars Collision
Big Idea: During a collision, adding a bumper creates a second force pair which reduces the overall force acting on the car.
-
One member of the group needs to open the Pocket Lab website.
-
Click the "Students Log in and work on lessons" button near the top center of the page.
-
Click "Student Login with Google."
-
Towards the top of the page, there should be 3 tabs. Click "Trials."
-
Click "Connect a PocketLab."
-
Click the "PL G-Force = Paired." **If you don't see that option pop up - that means the car is turned off. Press the button on the top of the car to turn it on.
-
Click "Pair" at the bottom right of the pop up window.
-
VERY VERY VERY IMPORTANT: Click the "Gear" picture in the upper right (It is a settings gear.). Choose "Crash Test."
9. There will be a Hot Wheels track is set up as a ramp so the car can run into the wall.
10. Set the pocket car at the top of the ramp.
11. On the Chromebook, click "Record."
12. Send the Pocket car down the track and observe the graph of data it collects on the Chromebook.
13. At the bottom of the data, click "Save."
14. Click on the saved data set.
15. Where it says "Untitled" - Click and type in "No bumper."
16. Repeat steps 10 - 15 two more times.
17. Place the "cushion" (The rolled up paper) next to the wall where the car will hit it. To do this, you need to set the rolled up paper standing up on end (vertical).
18. Repeat steps 10 - 15 three times....but name the data points "With Bumper."
Data Analysis:
- Compare the "Displacement" graphs for the "No Bumper" to the "With Bumper" data points. Do you notice how the "With Bumper" data is a smooth curve that is spread out while the "No Bumper" is a spike? This is showing you that the force of impact is being spread out over time with a bumper, resulting in a lower amount of force.
- Now, compare the G Force from the "No Bumper" and "With Bumper." To do this, click "Data Analysis." Look at the first green number next to the "Z." This is the G Force! Don't worry if the number is negative....with G Force, a bigger number (whether it is positive or negative) means a bigger G Force.
- Draw a diagram of the experiment on the back of your Balloon Rocket paper. Pay close attention to the Purpose of the diagram! The purpose needs to be shown in the Title, Caption, and Labels!
Check in with Mrs. Roehm and show her your answers and diagrams for a signature.


Q3P2: Text Evidence Practice
Google Classroom: Open up the Q3P2: Text Evidence Practice and complete it.
Pro Tip: Use your Pic Quick Color Coding as a reference! Make sure you include Pic Quick in your text evidence!
When you are finished, check in with Mrs. Roehm to get your signature.

Q3P3: NASA Space Lander Challenge
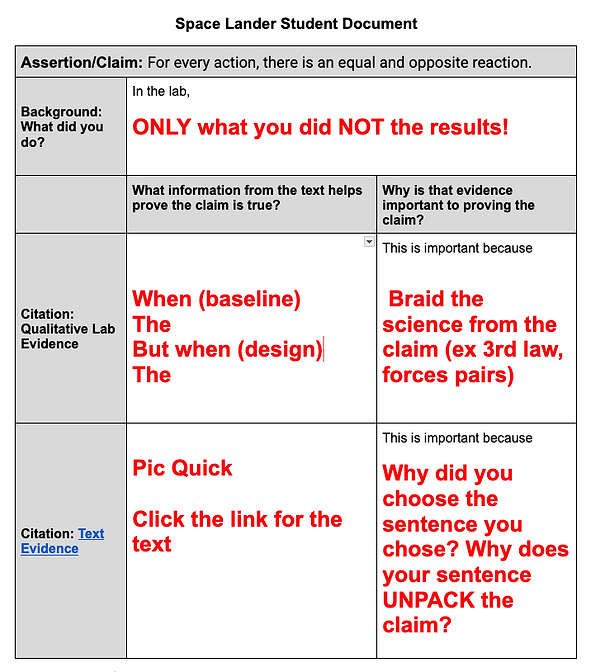
Google Classroom: Open up the Q3P3: Space Lander Document.
Follow the directions on Page 1 of the Document to design your Space Lander. Be sure to follow the constraints.
After successful completion of the challenge, complete the lab questions on Page 2 of your Space Lander Document. The Space Lander Text is linked right in the document.
When you answer the questions, follow the tips in red below.
Show Mrs. Roehm your answers. If you are fast paced, ask Mrs. Roehm to give you a "Bonus Challenge" for a "Bonus Stamp."

Q3P4: Rocket Annotated Sketch
Google Classroom: Open up the Q4P1: Rocket Annotated Sketch Assignment.
Watch this video to get a visual of what a launch might look like.
Engineers always research before designing. Read this Rocket Sketch Considerations Text to learn about Rocket Design.
Your job is to create an annotated sketch of what you think your water bottle should look like. Each member in your group must draw a sketch! But, you can talk about it together as you draw.
Annotated means that you must write short explanations of why you designed your rocket the way you did based on science. (Don't worry, I am not assessing your ability to draw!)
You must annotate the following with a short phrase or sentence that gives your reasoning for your choice:
-
Shape of nose cone
-
Shape of the fins
-
Number of fins
-
Height of rocket (Tall, Medium Height, or Small)
-
Center of Mass (Where is it? How will you "move" it to that location?)
-
Center of Pressure (Where is it? How will you "move" it to that location?)
Directions:
-
Research by reading this Rocket Sketch Considerations text before creating your annotated sketch.
-
Get a blank sheet of white paper. Draw your own annotated sketch. Make sure to include all 6 requirements listed above.
-
Complete the Claim and Text Evidence Boxes on your Google Doc.
Show Mrs. Roehm your Annotated Sketch, Claim, and Text Evidence for a signature.


Q3P5: Rocket Construction
The key to this procedure is that you need to create all of the "pieces" of your rocket first before putting anything together. In order to accurately place the center of mass and center of pressure, all parts need to be put together at the very end!
The procedure below will work for 90% of all designs. If you think your design requires a different procedure, ASK first before doing something different.
Rocket Part Procedure:
1. If the wrapper is still on the bottle, cut it off. But absolutely do
not poke any holes in the bottle.
2. Completely cover one two-liter bottle in duct tape (one layer
of duct tape - but it is ok if some tape overlaps). DO NOT CUT
ANY HOLES IN THIS BOTTLE. Go slow! It is worth it to take
your time and make the tape completely smooth. The entire
center part of the bottle should be covered, except for the
"bumpy bottom part" of the bottle. It will be covered by the
2nd 2-liter bottle (see the picture to the right).
(Read step 1, 2, and 3 before starting)
3. The tape should go down the neck of the bottle, but should not
cover or touch the "lip" of the nozzle. This will get in the way of the
rocket attaching to the launcher (see the picture to the right). It is
key that there are NO holes or cuts made to this bottle.
**Save the bottle cap! You will need it on launch day.
4. Cut the other two liter bottle in "half". I say "half" because it might really be 1/4 or 3/4 depending on how tall you want the rocket. The method that has given me most success with this is to keep the bottle cap on the bottle, use a razor blade or box cutter and poke a hole in the bottle, and then use scissors to cut the remainder. Mrs. Roehm has box cutters you can use, just ask if you need them. If you would like Mrs. Roehm to do the cutting with the razor blade, she will be happy to do it! This part of the bottle will fit on top of the "bumpy bottom part" of the full two liter bottle.
Cover the cut bottle half in duct tape (typically the top half). But, ABSOLUTELY DO NOT TAPE THIS HALF TO THE FULL BOTTLE YET!
5. Draw and cut out one fin from cardboard. One great strategy is to draw the fin with pencil. Then, use a box cutter to cut through JUST THE 1st LAYER of cardboard (not all the way through). Then, use scissors to cut the fin out.
6. Then, trace your fin on another piece of cardboard. It is important that every fin is identical! Duct tape each fin smoothly. (Don’t duct tape the fins to the rocket. Just cover them in duct tape separately.)
7. Make the nose cone (If you don't think you want a nose cone, let me know). To make a nose cone follow these steps:
a. Trace a circle (Mrs. Roehm has ice cream buckets for you to trace.) and draw a radius on a file folder. (a radius is half the diameter)
b. Cut the circle and the radius line.
c. Fold the cone into the desired shape. Make sure it fits on top of your half two liter bottle! Before you duct tape it, make sure it fits on your half bottle! If you can’t get it to fit, ask Mrs. Roehm for help. If you are wanting a wider base to your cone, you can cut off the top of the HALF bottle if you choose. (See the next page if you want a rounded top to your rocket)
d. If AND ONLY IF you want a rounded top instead of a pointy top, simply cut off the tip of the "party hat" and add clay to make a rounded top.
e. No matter whether you have a pointy or rounded top, duct tape completely and smoothly.
Before moving forward, make sure you have completed the following things already:
-
You have a full 2 liter bottle that has not been cut at all. That uncut 2 liter is covered in duct tape.
-
You have a 2 liter bottle that is cut in “half”. That cut 2 liter bottle is covered in duct tape.
-
You have 3 or 4 identical wings/fins that are covered in duct tape.
-
You have a nose cone that is covered in duct tape.
-
If you are using a toilet paper/paper towel roll, it is covered in duct tape.
-
All of your pieces are separate. They should not be attached to each other yet.
Assembly Procedure:
1. Duct tape the nose cone on to the "half" two liter bottle.
(Unless your nose cone is going on a paper towel/toilet
paper roll - then tape the nose cone to the roll. Then,
attach the roll to the half 2 liter bottle with duct tape.)
DO NOT TAP THE HALF BOTTLE TO THE
FULL BOTTLE YET.
2. Measure the circumference of the bottle. Divide that
measurement by the number of fins you have. This will
tell you how far apart your fins need to be. Make marks on your bottle where you want to place your fins BEFORE using the hot glue.(Look back at your sketch to remember where you want to place their fins on their bottle (Are they up high or down low?). Also, I always have students mistakenly put the fins on upside down. The mouth of the full two liter bottle is the BOTTOM of the rocket! Look at the pic to the right to see the direction the fins should go)
3. Hot glue the fins onto the full two liter bottle.
4. After the hot glue dries, you may want to add duct tape reinforcement along the edges where the hot glue is. This is not required, but it is something to consider.
5. Go ask Mrs. Roehm for a piece of clay. Place clay in the half
two liter bottle until the center of mass is in the appropriate
place. The rocket should balance right about where the half
bottle and full bottle connect. To start, the rocket will be bottom
heavy. (Adding clay moves the center of mass towards the front.)
To find if it is balanced, hold the rocket out horizontally and put
your pointer finger on the half bottle and your middle finger on
the full bottle (straddling right where they will connect). It is
important for you to consider how you put the clay in the half
bottle. If you simply put it as a ball inside, it will bounce around
inside and make the rocket unstable in flight. So, most students "smush" it to the sides of the bottle. When doing this it is important to make sure to spread the clay evenly to prevent the rocket being "lopsided".
6. When, and only when, the rocket balances at the right place, duct tape the half two liter to the whole two liter bottle. (If I was you, I would check with Mrs. Roehm first to confirm the center mass is where it is supposed to be.)
Show Mrs. Roehm your finished rocket and she will tell you where to store it until launch day.


Q3P6: Reassess
From Your Folder/Binder: Get out your Forces and Motion Learning Target Page.
Reassess only on targets FM.3 (Newton's 3rd Law), SEP7 (Text Evidence), and SEP2 (Diagrams).
Show Mrs. Roehm your completed self assessment tell her which target is your biggest strength and which is your biggest challenge (FM3, SEP7, or SEP2). Mrs. Roehm will give you a signature on your Assignment Tracker.